Full Moon and Bat Crochet Coaster – Free Halloween Pattern
A full moon and bat crochet coaster is Halloween at its most atmospheric. The centre is a glowing yellow moon, the outer rounds fade into a deep navy night sky, and a small black bat flies across the moon in silhouette. It is spooky in the gentlest, most beautiful way, and it looks lovely under a candle jar as well as a mug.
The coaster is a flat double crochet circle worked in three colours to make the glow. The bat is embroidered on top in black, which keeps the coaster completely flat and lets you draw any bat shape you like.
You need double crochet and a little simple embroidery. The bat shape is explained step by step, and you can draw it first with a washable pen.
Why this moon coaster works
A double crochet circle grows by twelve stitches a round — 12, 24, 36, 48, 60 — and stays flat at every size. By changing colour after the second round and again after the third, you get a bright moon, a soft halo and a dark sky, all in one flat circle.
Embroidering the bat rather than crocheting it is what makes it look so crisp. A crocheted bat would sit on top as a bump; an embroidered one becomes part of the surface, like a silhouette against the sky.
The honest trade-off: a five-round coaster is a little larger than average, about 5″ across. That makes room for the bat, and it suits candle jars and large mugs perfectly. For a smaller coaster, stop after four rounds and make the bat smaller.
Materials you will need
- Yellow yarn: about 6 yards of worsted weight cotton, for the moon
- Pale yellow or cream: about 8 yards, for the halo
- Navy yarn: about 20 yards, for the sky
- Black yarn or embroidery thread: a few yards, for the bat
- Hook: 4.0 mm (G-6)
- Notions: tapestry needle, scissors, a washable fabric pen
Finished size
About 5″ across in worsted cotton.
Abbreviations
- MR = magic ring.
- ch = chain.
- dc = double crochet.
- inc = 2 dc in the same stitch.
- sc = single crochet.
- sl st = slip stitch.
Step by step
Part 1: The moon
With yellow:
Round 1: Make a MR. Ch 3 (counts as dc), 11 dc into the ring. Pull closed and join to the top of the ch 3. (12)
Round 2: Ch 3, dc in the same st. Inc in each st around. Join. (24) Fasten off yellow.
Part 2: The halo
Round 3: Join pale yellow. Ch 3, dc in the same st, dc in the next st. *Inc, dc in next st*; repeat around. Join. (36) Fasten off.
Part 3: The night sky
Round 4: Join navy. Ch 3, dc in the next st, inc. *Dc in next 2 sts, inc*; repeat around. Join. (48)
Round 5: Ch 3, dc in the next 2 sts, inc. *Dc in next 3 sts, inc*; repeat around. Join. (60)
Round 6: Ch 1, sc in each st around. Join and fasten off. (60)
Part 4: The bat
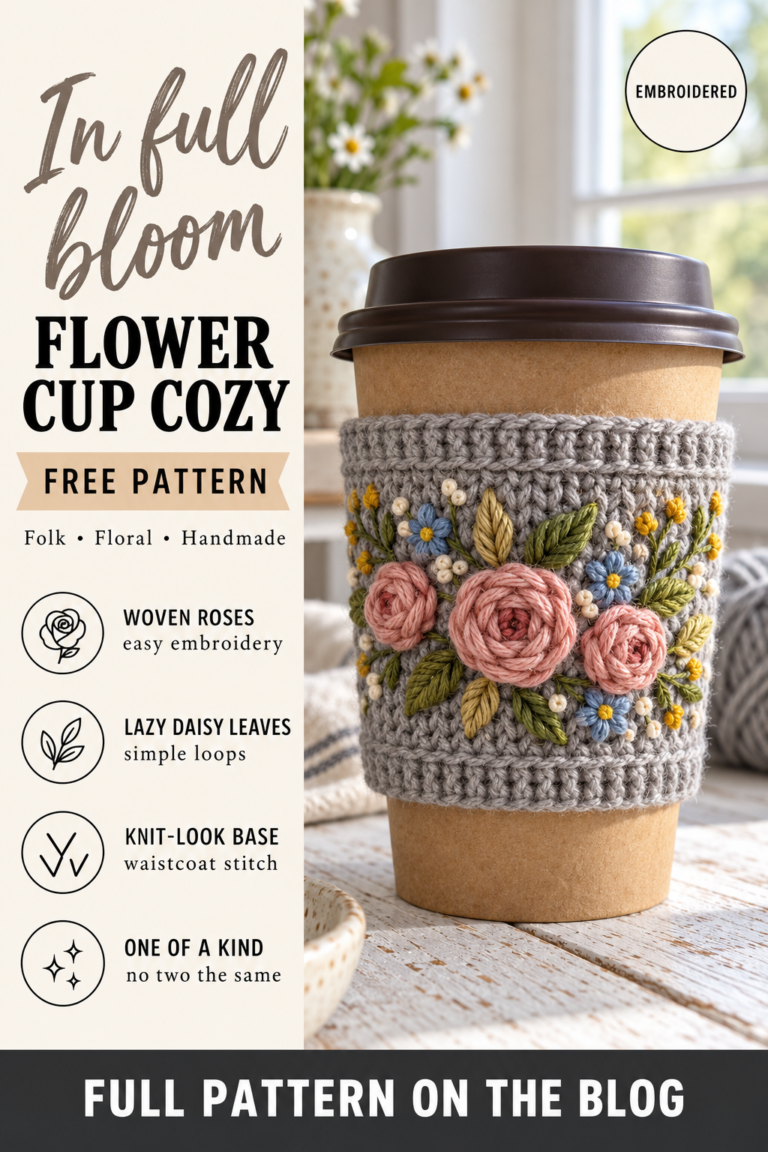
Lay the coaster flat. With a washable fabric pen, draw a small bat across the moon and halo: a small oval body in the centre, a pair of pointed ears, and a wing on each side shaped like a stretched “M”, with three scallops along the bottom edge of each wing. Keep it about 2½″ from wingtip to wingtip.
With black yarn or embroidery thread, outline the shape in small backstitches. Then fill the body and wings with satin stitch: straight stitches laid close together, side by side, until the shape is solid black.
Work the satin stitches in the direction of the wings — out from the body towards the tips — and they will catch the light like real wing membrane. Rinse away the pen marks when you are done.
Bat variations
- A flock: embroider three tiny bats at different sizes, flying across the moon and into the sky.
- A crescent moon: work Round 1 in yellow and Round 2 half in yellow, half in navy, for a crescent.
- Stars: add a few tiny white cross-stitches in the navy sky.
- A spooky tree: embroider a bare branch reaching across the bottom of the moon.
Colour ideas
Navy and yellow is the classic night sky. A deep purple sky with a pale lilac moon looks magical. An orange “harvest moon” on a black sky looks dramatic and very Halloween.
Finishing and care
Weave in ends on the back. Hand wash or machine wash cool and dry flat. If you used embroidery thread, check it is colourfast before the first wash so the black does not run into the yellow.
Frequently asked
I am not confident with embroidery.
Draw the bat first and practise satin stitch on a scrap. It is just straight stitches side by side; slow and steady gives a neat result.
My circle is wavy.
Count each round: 12, 24, 36, 48, 60.
Can I use it under a candle?
Only under an LED candle or a closed jar candle, never an open flame.
Why cotton is the right yarn for coasters
Coasters have two jobs: protecting a table from heat and soaking up the drips from a cold glass. Cotton does both better than any other fibre. It absorbs moisture instead of letting it run off, and it tolerates the heat of a hot mug without softening, melting or going shiny the way some acrylics can. It also washes well again and again, which matters for something that sits under coffee every day.
Look for plain worsted-weight kitchen cotton or a recycled cotton. Mercerised cotton has a lovely sheen and crisp stitches but absorbs a little less; it is perfect for decorative coasters and party tables.
Blocking coasters flat
Even a well-made coaster can curl slightly at the edge. Blocking fixes it in minutes. Wet the coaster, press out the water in a towel, lay it flat, pat it into shape and leave it to dry. For a quicker result, lay a damp cloth over it and press with a warm iron, lifting rather than sliding. Cotton responds very well to steam, and once blocked the coaster stays flat through many washes.
Embroidery tips for a crisp silhouette
The bat only looks like a silhouette if its edges are sharp. Three habits help. First, outline the shape in backstitch before filling it, so the satin stitch has a clean edge to work up to. Second, keep the satin stitches close together, with no fabric showing between them. Third, do not pull the stitches tight, or they will pucker the coaster; they should lie flat on the surface.
Embroidery thread gives the sharpest finish, but a single ply split from black yarn works well too. If your black thread is thick, use fewer, longer stitches so the bat does not become bulky.
Making a night-sky set
Make four coasters as a set, each with a different moon phase: a full moon, a half moon, a crescent and a new moon with only a faint halo. Add the bat to just one of them as a surprise. Laid together on a table they tell a little story across the night, and they look beautiful under candle jars at a Halloween dinner.
Common mistakes
The bat puckers the fabric: the stitches are too tight. Loosen them and press lightly with steam. The colours bleed: the thread was not colourfast. Test a scrap in warm water first. The moon looks off-centre: join each new colour in a different place around the circle so the seam lines do not stack up on one side.
How long it takes
The circle takes about thirty minutes. Drawing and embroidering the bat takes another twenty to thirty, depending on how detailed you make the wings. It is worth taking your time on the embroidery, since the bat is what makes the coaster special.
Giving it as a gift
Moon and bat coasters make a lovely gift for anyone who enjoys a gentle, atmospheric Halloween rather than a gory one. A pair in a small box with a tealight candle and a note makes a thoughtful present for a friend who loves autumn evenings.
Storing them between seasons
Embroidery is the most delicate part of this coaster, so store it flat with a sheet of tissue over the bat. Avoid folding or stacking heavy things on top. Washed gently and dried flat, the bat stays crisp and black for many Halloweens.
A final tip
Photograph your drawn bat before you start stitching. If the pen marks fade or rub off while you work, you can check the photo and keep the shape exactly as you planned it.
Before you start
Sketch your bat on paper at the right size before you start the coaster. More Halloween makes are in Halloween.