How to Make Crochet Ribs Spiral: Bias Crochet Explained Simply
Spiral ribs look like advanced crochet. They are not. They come from one small habit — shifting every row over by a single stitch — and once you understand why that works, you can put a twist into pumpkins, hats, cowls, bags and anything else that is worked as a tube.
This guide explains the idea simply, shows how to control the angle of the spiral, how to reverse its direction, and how to avoid the mistakes that make a spiral look messy. It is the technique behind the spiral swirl pumpkin, but it is useful far beyond pumpkins.
What bias crochet means
In sewing, the bias is the diagonal direction across a fabric. In crochet, working on the bias means making fabric whose rows run at an angle to its edges instead of straight across.
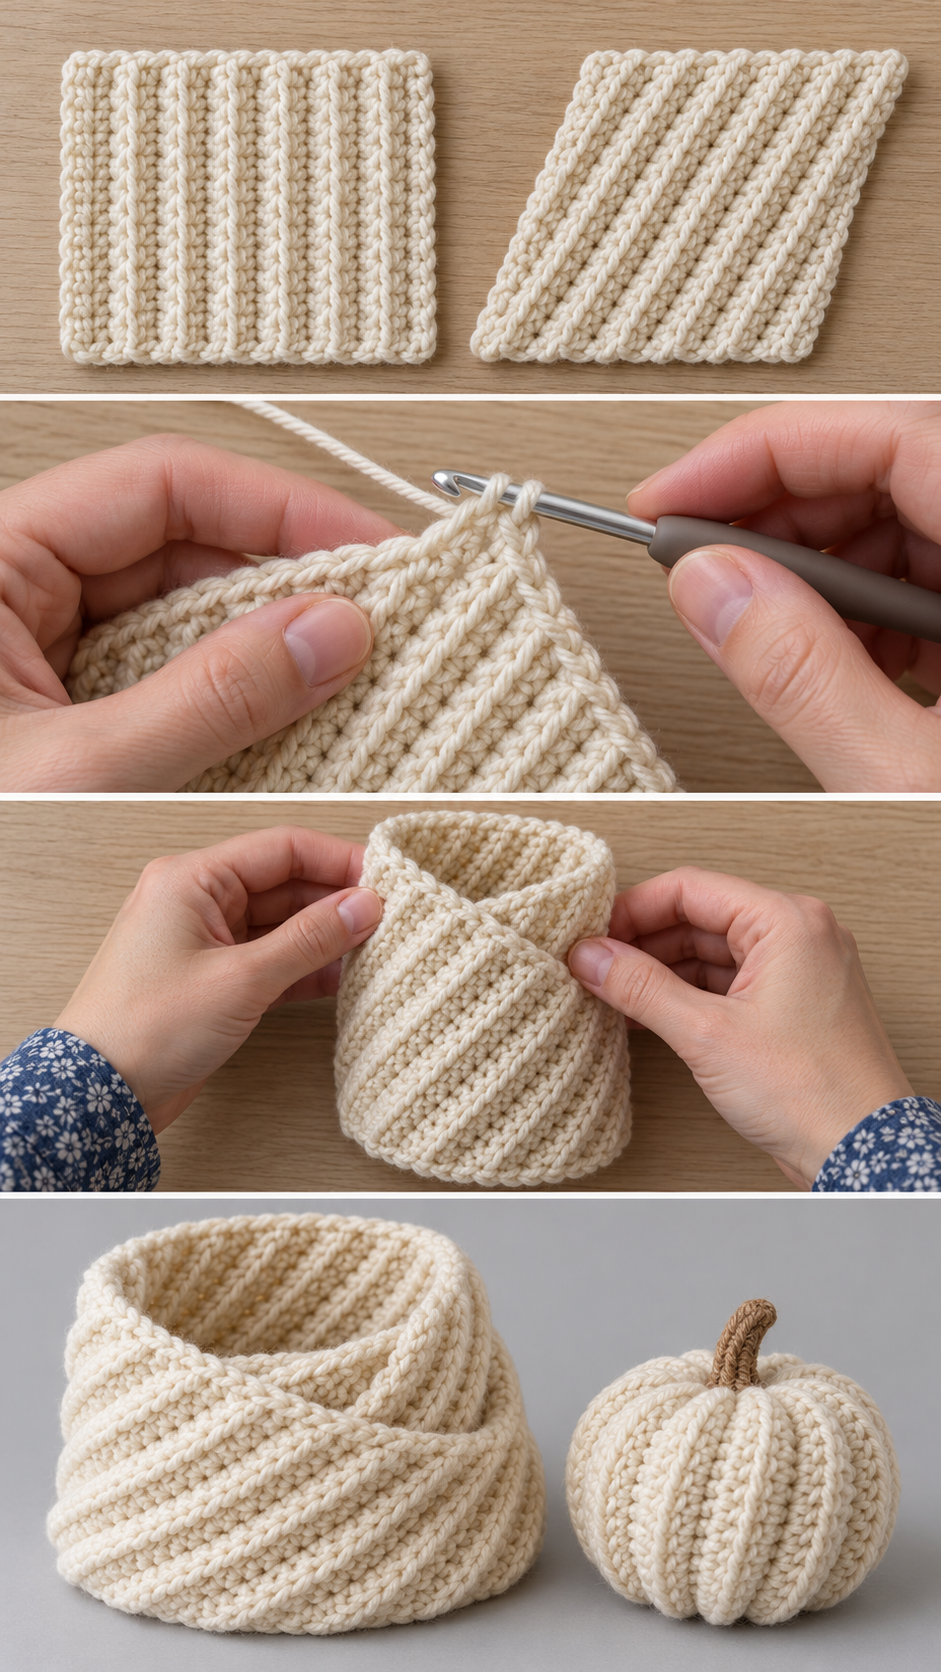
Normal flat crochet makes rectangles. Each row starts directly above the start of the row below, so the side edges are straight and the rows are parallel to the top and bottom. Bias crochet keeps the rows parallel to each other, but moves each one sideways a little. The edges lean, and the rectangle becomes a parallelogram.
The simple rule
To shift a row by one stitch, add one stitch at one end and remove one at the other:
- At the start of the row: work an increase — two stitches into the first stitch.
- At the end of the row: work a decrease — two stitches worked together.
One stitch added, one stitch removed. The total never changes, but the whole row has moved over by one stitch. Repeat every row and the piece leans steadily in one direction.
Because the stitch count stays constant, bias crochet is very easy to check. Count the first row, and every row afterwards must match it exactly.
Why the ribs spiral
Ribs come from working in the back loop only, which leaves the front loops standing up on the surface as ridges. Each ridge runs along a row.
On a rectangle, when you join the two short ends into a tube, the rows run straight up and down the tube, so the ribs are vertical. On a bias parallelogram, the rows are still straight, but the piece itself is slanted. When you join it into a tube, the rows can no longer line up with the tube’s axis — they wind around it at an angle. The ribs spiral.
Controlling the angle
The steepness of the spiral depends on how quickly the rows shift.
- Shift every row: a strong spiral of roughly 45 degrees in single crochet, because a single crochet is about as tall as it is wide.
- Shift every other row: a gentle, relaxed twist of roughly half the angle.
- Shift every third row: a very subtle lean, almost straight.
- Shift two stitches per row (increase twice at the start, decrease twice at the end): a steep, dramatic spiral.
Taller stitches change the angle too. In half double or double crochet, each row is taller than it is wide, so shifting one stitch per row gives a steeper, more upright spiral than the same shift in single crochet.
Reversing the direction
To make the spiral turn the other way, swap the ends: decrease at the start of the row and increase at the end. The piece leans in the opposite direction, and so does the twist.
Pairs of pumpkins or cowls with mirrored spirals look striking side by side, and reversing the twist halfway up a piece gives a chevron-like zigzag where the two directions meet.
Joining a bias piece into a tube
This is where bias pieces trip people up. Because the piece leans, the first and last rows do not sit square to each other. Do not try to line up the corners. Instead, line up the stitches: the first stitch of the first row meets the first stitch of the last row, and so on along the row. Pin a few points first. Seam with a whip stitch through both loops so the join is as flat as possible.
Once joined, the top and bottom edges of the tube will be slightly wavy. That is normal. When you cinch them, as for a pumpkin, the waviness disappears into the gathers.
Where to use spiral ribs
- Pumpkins and gourds: the classic use; the swirl looks wonderful on a shelf.
- Hats: a ribbed brim worked on the bias spirals around the head.
- Cowls: a bias tube makes a cowl that twists elegantly when worn.
- Baskets: spiral ribs on the walls of a round basket look sculptural.
- Cushions: a bias-worked cover gives diagonal ribs across a round or bolster cushion.
Common mistakes and how to fix them
The spiral is uneven
An increase or decrease was skipped on some rows, so the stitch count wandered. Count every few rows.
The piece is curling
Bias fabric naturally wants to roll a little. Blocking flattens it, and once it is joined into a tube the curl disappears.
The seam is twisted
The corners were matched instead of the stitches. Unpick and match stitch to stitch along the row.
The ribs are faint
Some stitches were worked through both loops. Every stitch, including the increases and decreases, should go into the back loop only.
Bias crochet in other stitches
Single crochet worked in the back loop gives the clearest ribs, but the bias technique works with almost any stitch. In half double crochet worked into the third loop, you get a thicker, knit-like rib that spirals beautifully on hat brims and cowls. In plain single crochet through both loops, there are no ribs, but stripes of colour will spiral instead — a lovely effect on a cowl or a pencil case.
In double crochet, the taller stitches make the spiral much steeper and more upright. Because each double crochet row is roughly twice as tall as it is wide, shifting one stitch per row gives an angle closer to 60 or 70 degrees from horizontal rather than 45. For a softer twist in tall stitches, shift every other row.
Using colour with bias crochet
Stripes look completely different on the bias. Change colour every two rows on a bias tube and the stripes become spirals, like a candy cane or a barber’s pole. This is a lovely way to use up leftover yarn on cowls, wrist warmers and small bags, and it adds a whole new look to a pumpkin: try alternating cream and rust stripes for a striped spiral gourd.
Because the stitch count never changes, you can change colour at the same end of every second row and the stripe width stays perfectly even all the way round.
Calculating how many rows you need
For a tube, you need enough rows for the piece to reach all the way around. Measure your row height — how many rows per inch — from a small swatch, then multiply by the circumference you want. For a cowl that measures 24 inches around, at 4 rows per inch, you need about 96 rows.
Remember that the slant shortens the height of the finished tube a little. If the height matters, as it does for a hat brim or a cowl, add a few stitches to the foundation chain to make up for it, or make a test tube first and measure.
Blocking bias fabric
Bias fabric is more stretchy along its diagonal than ordinary fabric, which is part of what makes it drape so well. It also means it can stretch out of shape. Block flat pieces gently, pinning the edges straight without pulling. For tubes such as cowls, lay them flat, spray lightly with water and leave them to dry. Never hang a wet bias piece; its own weight will pull it longer.
Why bias crochet is worth learning
Once you understand bias crochet, you start seeing it everywhere: the twisted ribs on a shop-bought knitted hat, the diagonal stripes on a scarf, the swirl of a sculptural basket. It is one of those techniques that adds a professional, designed look for almost no extra difficulty. One increase, one decrease, every row — and your crochet starts to move.
A quick practice exercise
Before you try bias crochet on a real project, make two small swatches side by side. Chain 13 for both. Work the first as an ordinary rectangle of back-loop single crochet for 20 rows. Work the second with an increase at the start and a decrease at the end of every row, also for 20 rows. Lay them next to each other and the difference is obvious: one is square, the other leans. Roll each into a tube and you will see the straight ribs on one and the spiral on the other. Ten minutes of practice makes the whole technique click.

Before you start
Make a small practice piece: chain 15, work twenty rows of bias back-loop single crochet, and roll it into a tube. Seeing the spiral appear in your own hands is the fastest way to understand it. Then try it on the spiral swirl pumpkin.